


It all begins with a NAME. Draft sketch basics. Japanese Manga 101 #024
We’ll be showing you how and what you need to draw a “NAME”, the draft storyboard. We begin with the basic terminologies for page layout, which will help you make the best out of the pages you have! We have more detailed guides on our website, in PDF format for you to use! 
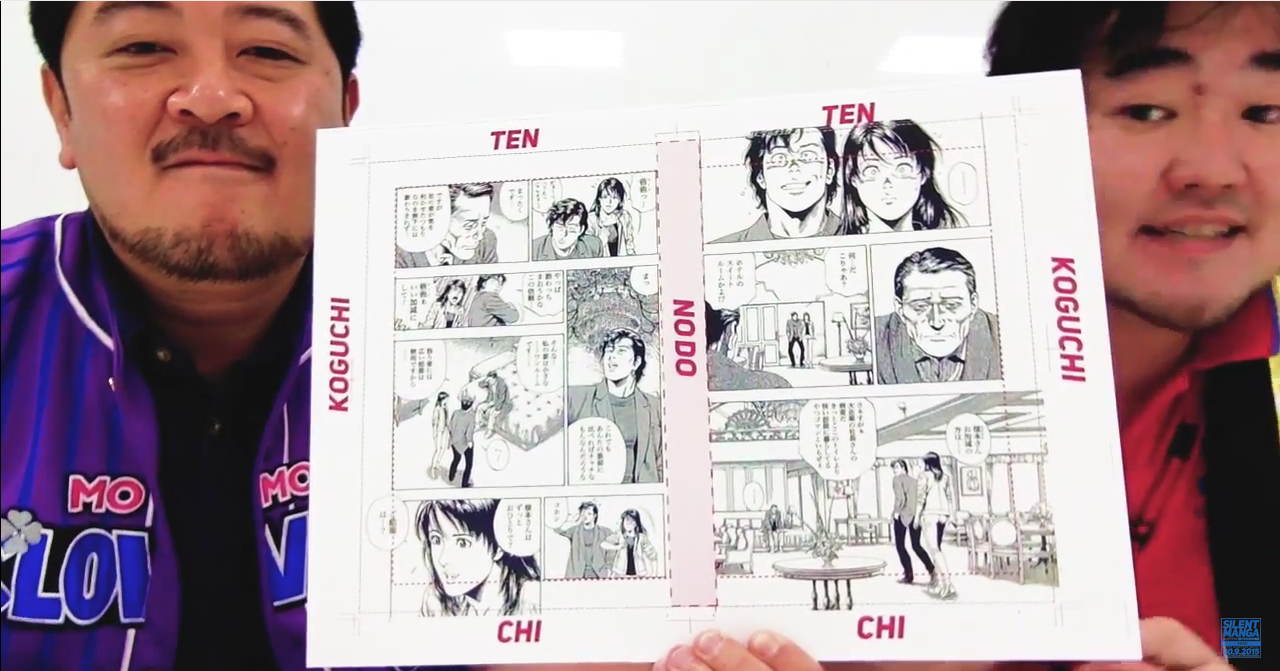
 This is an actual manga proof print in W-page spread. Let’s start with the basics. We call the upper end of the sheet, “TEN”, Meaning “The Sky”. Lower end of the sheet, “CHI”, meaning “The Ground”. Easy to remember, right? Now, we call the sideways edges of the spread, “Koguchi”, meaning “the Trimmed Edge”. In manga page template, the area inside dotted line is called the “Hanmen”, “The Main area”. While the central region where the right and left pages will be bound together as a book, is called the “NODO”, meaning “the Throat”. And two vertical margins by the “Koguchi”, are the “Hashira”, “The Pillars”.
 In Hojo sensei’s pages, there are panels that are drawn beyond the dotted line, outside of Hanmen right to the outer trim line. These panels are called “Tachikiri”, meaning, “To be trimmed”. Remember you have roughly “25mm” outside of “Hanmen” that you can use, that goes to print. Please also keep in mind, that those dimensions are the for the manuscript paper only. Printed dimensions differ as we “shrink” the manuscript, for the final print. In this proof print, we have the “Tachikiri Sen”, the inner trim line, overlaid and printed. This dotted line shows, where the book binders trim off when they go to print. When drawing a Tachikiri yourself, be careful and considerate, when determining exactly where you put your drawings or speech balloons. One more important thing to remember about Tachikiri, is that it NEVER happens in the “Nodo” region. Because that region will be hard to see when bound as a book. Remembering this rule is easy. “It’s a No-DO, in NODO” ! So here’s a recap,
 GOT IT? There are many ways to do the name, so we figured it’s best to learn from the best. Of course that’s Hojo sensei! Next time we’ll be taking a look at the actual names drawn by Hojo sensei himself. That is one rare opportunity you really can’t afford to miss. See you next time!
This is an actual manga proof print in W-page spread. Let’s start with the basics. We call the upper end of the sheet, “TEN”, Meaning “The Sky”. Lower end of the sheet, “CHI”, meaning “The Ground”. Easy to remember, right? Now, we call the sideways edges of the spread, “Koguchi”, meaning “the Trimmed Edge”. In manga page template, the area inside dotted line is called the “Hanmen”, “The Main area”. While the central region where the right and left pages will be bound together as a book, is called the “NODO”, meaning “the Throat”. And two vertical margins by the “Koguchi”, are the “Hashira”, “The Pillars”. In Hojo sensei’s pages, there are panels that are drawn beyond the dotted line, outside of Hanmen right to the outer trim line. These panels are called “Tachikiri”, meaning, “To be trimmed”. Remember you have roughly “25mm” outside of “Hanmen” that you can use, that goes to print. Please also keep in mind, that those dimensions are the for the manuscript paper only. Printed dimensions differ as we “shrink” the manuscript, for the final print. In this proof print, we have the “Tachikiri Sen”, the inner trim line, overlaid and printed. This dotted line shows, where the book binders trim off when they go to print. When drawing a Tachikiri yourself, be careful and considerate, when determining exactly where you put your drawings or speech balloons. One more important thing to remember about Tachikiri, is that it NEVER happens in the “Nodo” region. Because that region will be hard to see when bound as a book. Remembering this rule is easy. “It’s a No-DO, in NODO” ! So here’s a recap,Tachikiri, goes towards “Ten”, “Chi”, and up to the right “Koguchi”on the right page, and onto the left “Koguchi” on the left page.
Good use of Koguchi will give readers a more wide, spacious, less cramped feeling. Also remember NOT to cut off characters faces or arms and legs, as that will make the scene feel a lot more confined and cramped. Now you know the basics, always remember those rules, when drawing the name! GOT IT? There are many ways to do the name, so we figured it’s best to learn from the best. Of course that’s Hojo sensei! Next time we’ll be taking a look at the actual names drawn by Hojo sensei himself. That is one rare opportunity you really can’t afford to miss. See you next time!RELATED ARTICLES :
-

SMA15 Moments of… CRYING: Yako Gureishi
-

SMAC! MANGA DOJO #13 – "NEVER STEAL CHARACTERS!"
-


Great Manga Intro: Are you STAR WARS or INDIANA JONES? Japanese Manga 101 – #014
-
SMAC! MANGA DOJO #9 – "4 'IFs' that creates Manga"
-
SMAC! MANGA DOJO #7 – "Do not fear the 'ROYAL ROAD'!!"
-

SMA13-UNESCO Round Case Studies #8: Indigenous Empowerment
-
SMAC! MANGA DOJO #12 – "STEAL the ideas wisely!"
-

SMA13-UNESCO Round Case Studies #7: Giving Voice to Vulnerable Youth
-

EX4 CRAM SCHOOL – LESSON #4: DRIVE to SUCCEED!
-

Manga S.O.S. #3 – Making a SPLASH with composition!