


Manga Panel Layout Basics – "2×4" Grid – Japanese Manga 101 – #010
Today we are gonna dig deeper, into the art of paneling. Here is the video : When we work on laying out panels, the most important thing we look for is “Smoothness”. How easy the panels are to follow, without distraction. It just won’t be a successful manga, if it’s not easy to read.
So what makes smooth, flowing panel layouts? Let’s take a look at this example. To make sure the reader knows what order to read the panels, make the gap smaller, between panels that are side by side, while keeping a bigger gap, between each row. Resulting in one continual line of motion, for the readers’ eyes. This is the foundation of good, easy to follow panel layout.
  Of course, it may be a little boring, if all the panels are of the same size. So, mix it up a little. Make panels that are important or impactful, larger than the others. Divide panels vertically or at an angle, to create the rhythm, and dynamism. Maybe draw characters only, to stick out of a panel, overlaid atop multiple panels.
 Panels are arranged, right side page : “7 panels in 4 rows”
On the left page, we have our hero Ryo, so he appears in a large panel, with events happening around him. That’s “6 panels, 4 rows”. Then it’s the climax!
Panels are arranged, right side page : “7 panels in 4 rows”
On the left page, we have our hero Ryo, so he appears in a large panel, with events happening around him. That’s “6 panels, 4 rows”. Then it’s the climax!
 Our hero Ryo fires the shot, in the wide, largest panel in this episode. That’s 5 panels, in a double page spread. Can you see, how varying the panel size and density creates dynamism in your story telling?
 for the scenes in-between, he uses smaller panels laid out in order. Right-side: 6 panels 4 rows/ Left-side : 8 panels 4 rows. Then the story speeds up!
 Right side, 4 panels in 3 rows, left side : 5 panels in 3 rows Then the climax!
  Composed of 3 panels, with one extremely large panel!
 GOT IT? In the next episode, we are gonna take a look at camera angles. What and how to draw each panel, that draws a reader into your world. And make sure to subscribe to our channel, not to miss an episode!
See you next time!
GOT IT? In the next episode, we are gonna take a look at camera angles. What and how to draw each panel, that draws a reader into your world. And make sure to subscribe to our channel, not to miss an episode!
See you next time!
THE BASIC – 2×4 grid
In most basic forms of story manga, you have a 2×4 grid. 4 rows, with 2 panels each. Sometimes you have large or small panels, so on average 6 to 8 panels a page. To make sure the reader knows what order to read the panels, make the gap smaller, between panels that are side by side, while keeping a bigger gap, between each row. Resulting in one continual line of motion, for the readers’ eyes. This is the foundation of good, easy to follow panel layout.  Of course, it may be a little boring, if all the panels are of the same size. So, mix it up a little. Make panels that are important or impactful, larger than the others. Divide panels vertically or at an angle, to create the rhythm, and dynamism. Maybe draw characters only, to stick out of a panel, overlaid atop multiple panels.
 EXAMPLES : Hojo sensei’s works
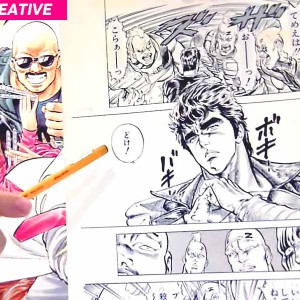
Now let’s learn from the actual manga pages. By none other than Hojo sensei’s! Before the climax, is a scene that tells the story background. Many details to show the reader, Panels are arranged, right side page : “7 panels in 4 rows”
On the left page, we have our hero Ryo, so he appears in a large panel, with events happening around him. That’s “6 panels, 4 rows”. Then it’s the climax! Our hero Ryo fires the shot, in the wide, largest panel in this episode. That’s 5 panels, in a double page spread. Can you see, how varying the panel size and density creates dynamism in your story telling? EXAMPLE : Hara sensei
Now let’s take a look at Hara sensei’s panel layout! While famous for his impactful, large panel actions,for the scenes in-between, he uses smaller panels laid out in order. Right-side: 6 panels 4 rows/ Left-side : 8 panels 4 rows. Then the story speeds up! Right side, 4 panels in 3 rows, left side : 5 panels in 3 rows Then the climax! Composed of 3 panels, with one extremely large panel! Conclusion
See how even the seasoned masters, stick to the basic rules of “6-8” panels a page, then only slightly deviating from it? Those are the building blocks, that give the climax panel a strong, lasting impression. Drawing those small panels may require a lot of effort. But it is absolutely necessary, to show the reader the scene and events that lead up to the climax. That is why we advise everyone to stick to a “2×4” grid, with 6 to 8 panels a page. It works for the masters, no reason why it shouldn’t work for you! GOT IT? In the next episode, we are gonna take a look at camera angles. What and how to draw each panel, that draws a reader into your world. And make sure to subscribe to our channel, not to miss an episode!
See you next time!RELATED ARTICLES :
-

MANGA PLANNING THE PROFESSIONAL WAY! 2 – Japanese Manga 101 #042
-

SMA13-UNESCO Round Case Study #1: Ending School Bullying
-
Why is a NAME called a NAME? / 5 criteria to watch out for – Japanese Manga 101 #028
-

Manga S.O.S. #3 – Making a SPLASH with composition!
-


"Draw to Flow" Japanese Manga 101 – #003 Art of Paneling Basics 1
-
SMA13-UNESCO Round Case Studies #5: Digital Gender Bias
-

Kakimoji S.O.S. #22 – Tsugihara Sensei's Kakimoji
-
THE DYNAMISM CHART of a storyline- Japanese Manga 101 #021
-


SMAC! MANGA DOJO #7 – "Do not fear the 'ROYAL ROAD'!!"
-
SMAC! MANGA DOJO #4 – "GET IT DONE!"